My Gear:
- Camera: Nikon D850
- Lens: Nikon 16–35mm f/4 VR
- Tripod: Velbon ex-650
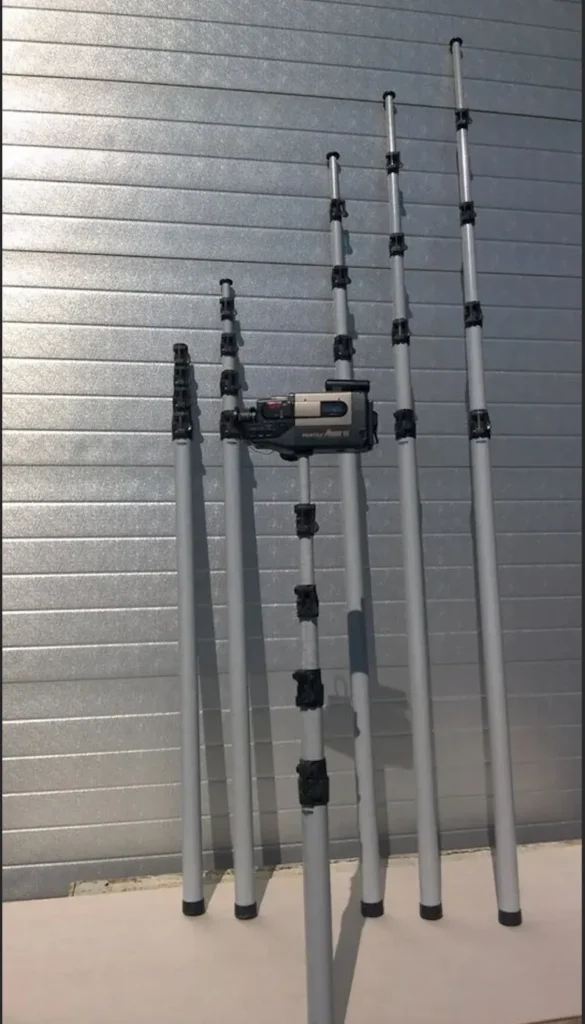
- Telescope for outside: Merkvil Oy (only in Finland unfortunately)
(I will attach a photo of the telescope in the end of this post)
Real estate photography is NOT hard when you understand just few simple things before starting. When I started doing real estate photography I was a bit sceptical and I didn’t think that it would be fun, but oh man was I wrong. I really enjoy doing real estate photography because it’s the perfect way to meet new people, see different houses and apartments. It’s also super rewarding to see the final photos and deliver them to clients who also like the results.
1. Prep the Property or the Apartment
- Declutter and Stage: Remove personal items (pictures), clean surfaces, and arrange furniture to create an inviting, neutral space.
- Style the rooms: Remove or add something to the scene to make it nicer.
Clean your fridge door / take all personal stuff off! (this one is important)
- Let There Be Light: Open curtains, turn on all lights (only if there isn’t enough natural sunlight). Natural light is your best friend!
- Shoot at the Right Time: Schedule exterior shots during the day when there is enough light. But make sure that you are not shooting too early in the morning or too late when the “blue hour” is making everything the wrong shade.
My experience: Right now in Finland the sun is rising at 8.27 am according to apple weather and the sun is setting at 4.41 pm so the best time to take photos is from 10am to 3pm before it’s too dark
Remember: If you are moving some things around the house ALWAYS ask for a permission before touching anything. Sometimes customers/home owners have cleaned and put stuff for a specific locations and then you move it how you like it… rarely they are happy about it. You are there just to take the photos and the owners / real estate agents can decide how everything is around the house or apartment but if they ask your opinion then of course you can give your opinion about it.
I always tell the owners / real estate agents that they can style the house or apartment how they like it because it’s not my apartment or my listing. Remove the family photos or personal things if you don’t want anyone seeing them online.
2. Master Composition and Angles
- Highlight Key Features: Focus on selling points like fireplaces, hardwood floors, or a chef’s kitchen.
- Use the Rule of Thirds: Position focal points (e.g., a bed or dining table) along gridlines for balanced shots.
- Shoot at “Table” Height: My camera is always on stomach or table height (about 3ft height). Avoid tilting the camera upward or downward, which can warp proportions.
- Capture Multiple Angles: Shoot wide shots of each room, plus close-ups of unique details. Usually I take 2–3 shots from each room (unless the room is big then i take more)
3. Perfect Your Lighting
- Bracket Your Exposures: Take 3–5 shots at different exposures and combine them in to one picture in Adobe Lightroom or other photoediting softwares.
- Avoid Over Exposing The Lights/Lamps: Make sure that the lights are off. If you don’t have enough natural light then you can put on the lights. Many kitchens have harsh lights under the cabinets and I always turn those off even if it’s too dark because you can fix the issue using the kitchens cealing lamp.
4. Edit Like a Pro
- Straighten Lines: Use tools like Lightroom’s “Transform” panel to fix skewed walls or windows.
- Enhance Colors: Boost vibrancy slightly, but keep edits natural — over-editing can mislead buyers.
- Remove Distractions: Clone out power cords, trash cans, or reflections in mirrors.
How To Take The Outside Photos
- Don’t use too wide lens (24–35mm gives realistic size of the house)
- Wait if there are people or cars in the shot. Let them pass or edit them out.
- Move further to get the house in frame
- Keep the camera straight and leveled so the houses roof or the walls won’t be distorted
- Take multiple photos from different heights and angles.
- Pay attention to the sun! Sun should always be behind you for the perfect exposure.
- I always make sure I have 2–3 photos to deliver to the customer after editing
- Buy a Areal Mast to take photos from higher. (or use a drone but the mast is cheaper option)
Common Mistakes to Avoid
- Overusing Wide-Angle Lenses: Too much distortion can make rooms look unrealistic. I use Nikon 16–35mm f/4 VR. In my opinion the 16mm is best and would not use any wider lens even if I had one.
- Ignoring Vertical Lines: Crooked walls or slanted windows look unprofessional. Try fitting 3 walls in the picture and line the cealing so that it is straight
- Skipping the Prep Work: A messy room or unmade bed distracts from the property’s potential. Remember that the property is on sale… not the furniture or other things in the room
- Make sure that the photo is sharp! It’s a horrible hassle if you would have to go back and reshoot one photo again…
- Take 2-5 (or more) extra photos for the clients to purchase later. Since you are already in the location why not take few extras. This is also a good way to make sure you have extras if one photo didn’t turn out the way you would have liked it to be. (I take two angles of each room so I can have a backup photo)
Building Your Real Estate Photography Business
- Create a Portfolio: Showcase before-and-after shots, different property types, and unique styles.
- Network with Agents: Attend real estate events or offer free shoots for testimonials. Contact your local agents and businesses and offer your services.
You can also see your local Airbnb listings and offer to take professional photos for them.
- Price Competitively: Charge per property (e.g., 150–250–500) or offer package deals.
Do a test and calculate how much time you spent shooting and editing one property. Then you can decide how much to charge. (remember to include the time getting there and back to home)
Conclusion
Real estate photography is equal parts art and strategy. By mastering lighting, composition, and storytelling, you can transform any property into a buyer’s dream home. Whether you’re aiming to sell faster, attract premium clients, or launch a photography career, the effort you invest in perfecting your craft will pay dividends.
So grab your camera, stage that living room, and start taking real estate photos that don’t just sell — they inspire. Real estate photography is not difficult so don’t make it difficult for yourself, learn as you go.
Remember these rules and you are good to go!
- Turn off lights
- Remove clutter and personal items
- Don’t use too wide lens (16–35mm is perfect)
- Open curtains
- Use Auto Bracket
- Check the weather before scheduling the photoshoot and update the owners/real estate agents if there are any changes that would affect the shoot!
Photo of the Telescope mast/tripod for taking the outside photos: